Semi-auto generated page
Introduction
In this article, I will describe, how I realized my small site project using free services and semi-auto generated pages.
Problem description
Some time ago I wanted to realize my tiny project: Released.info webpage, where I wanted to track whether a given technology is already released.
My functional requirements were:
- I wanted to periodically check whether a given technology has been released and regenerate the page.
- I wanted the page to be updated every day, so I can update a counter on the page. That’s why I call it
semi-auto generated. An example of the counter is presented in the picture below.

My non-functional requirements were:
- The hosting cost should be as small as possible - ideally
free.
Chosen architecture
Domain provider
I decided to park my domain on Namecheap, without any good reason. I just like the service.
Webpage hosting
My webpage is hosted on GitHub Pages. It is a free hosting service for repositories smaller than 1 GB.
Additionally, GitHub Actions provide 2_000 minutes of free code execution per month.
(GitLab offers 400 free minutes, which also should be fine).
GitHub repositories
I organized my code into two repositories:
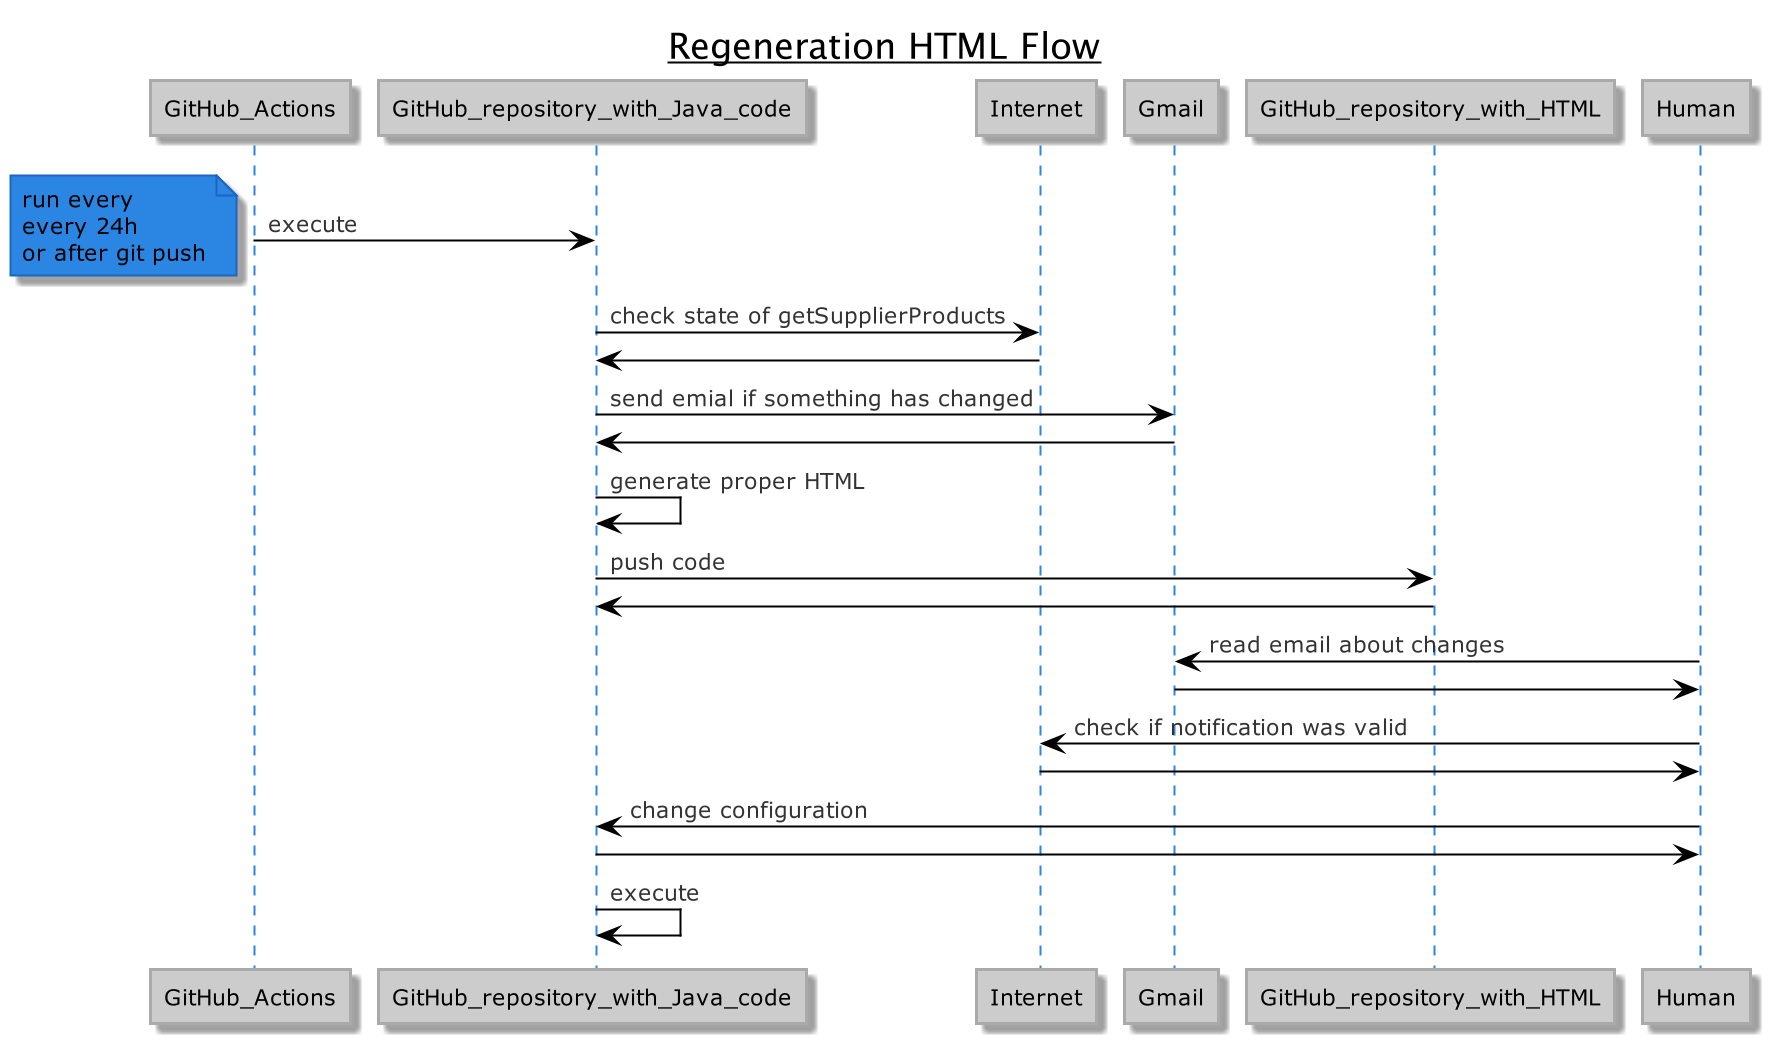
- The first repository contains Java code, which is doing some actions periodically and after the pull request is merged:
- crawl pages and determine whether the technology was released; if yes, send an email to myself, so I can validate it manually,
- generate the webpage code (including updated counters),
- push the static webpage to the second repository,
- The second repository simply serves as a static webpage.
You can follow the process in the diagram below

Manual configuration
The big elephant in the room is the manual interventions taken by humans. The webpage is in a state for which I do not fully trust software decisions. Webpage crawling is implemented in a pretty simple way. I just search for some keywords with the version. From this experience, I realized that web pages and the format of content change pretty often. I decided that for this stage I will notify myself when the webpage changes. I performed a manual configuration change of the page, so it can be regenerated. It doesn’t take much time. Maybe in the future, the algorithm will be good enough to trust it.
Generation of a static webpage
To generate static pages, I used an extremely easy method. Inside a test, I put a code that generates a static webpage. Java code generates the webpage with Thymeleaf templating system.
I will show only a small example of the HTML page with templates:
<span class="card-text">
  <th:block th:utext="${configuration.getMainTitle}" />
</span>
Later it is processed by a Java code:
private static String generateHTMLPage(List<Configuration> configurations) {
  TemplateEngine templateEngine = new TemplateEngine();
  ClassLoaderTemplateResolver resolver = new ClassLoaderTemplateResolver();
  resolver.setPrefix("/templates/main/");
  resolver.setSuffix(".html");
  resolver.setCharacterEncoding("UTF-8");
  resolver.setTemplateMode(TemplateMode.HTML);
  templateEngine.setTemplateResolver(resolver);
  Context ct = new Context();
  ct.setVariable("configurations", configurations);
  ct.setVariable("commentedTimestamp", configurations.get(0).getCommentedTimestamp());
  return templateEngine.process("index.html", ct);
}
The values for placeholders are passed here: ct.setVariable("configurations", configurations);.
The generated HTML file I save on a disk to a temporary directory. These files are later pushed by GitHub Actions plugin to a separate repository.
Github Action configuration
The GitHub configuration is placed in the repository: .github/workflows/maven.yaml.
It is executed by cron once per 24 hours. It executes an mvn clean install build and then pushes the output directory to the repository with static content.
Push is done by GitHub plugin: dmnemec/copy_file_to_another_repo_action@main.
name: Java CI with Maven

on:
  push:
    branches: [ master ]
  pull_request:
    branches: [ master ]
  schedule:
    - cron: '0 */24 * * *'
jobs:
  build:
    runs-on: ubuntu-latest

    steps:
    - uses: actions/checkout@v2
    - name: Set up JDK 17
      uses: actions/setup-java@v2
      with:
        java-version: '17'
        distribution: 'adopt'
    - name: Build with Maven
      run: mvn clean install

    - name: Push-Main
      uses: dmnemec/copy_file_to_another_repo_action@main
      env:
        API_TOKEN_GITHUB: $
      with:
        source_file: 'output/main/.'
        destination_repo: 'released-info/released-info-main'
        destination_folder: '/'
        user_email: 'contact@released.info'
        user_name: 'contactReleasedInfo'
        commit_message: 'Update html'
GitHub token
Your repository with Java code needs to have permissions to push code (HTML pages) to the second repository.
In the GitHub actions configuration, in the plugin: dmnemec/copy_file_to_another_repo_action@main, I configured it to use my token: API_TOKEN_GITHUB: $.
You can generate a new token here: https://github.com/settings/tokens
and I configure it correctly. For me, it was permissions: repo and workflow.
Static webpage
A static repository placed in GitHub Pages serves a static webpage.
It uses a Content Delivery Network (CDN)
It offers HTTPS, and it is very easy to point a domain to it.
By default, your webpage is available by URL: https://<user>.github.io.
Domain configuration
I would like my page to be available under the URL: https://released.info and I would like to make some other funny subdomains https://is.java.released.info.
Namecheap configuration
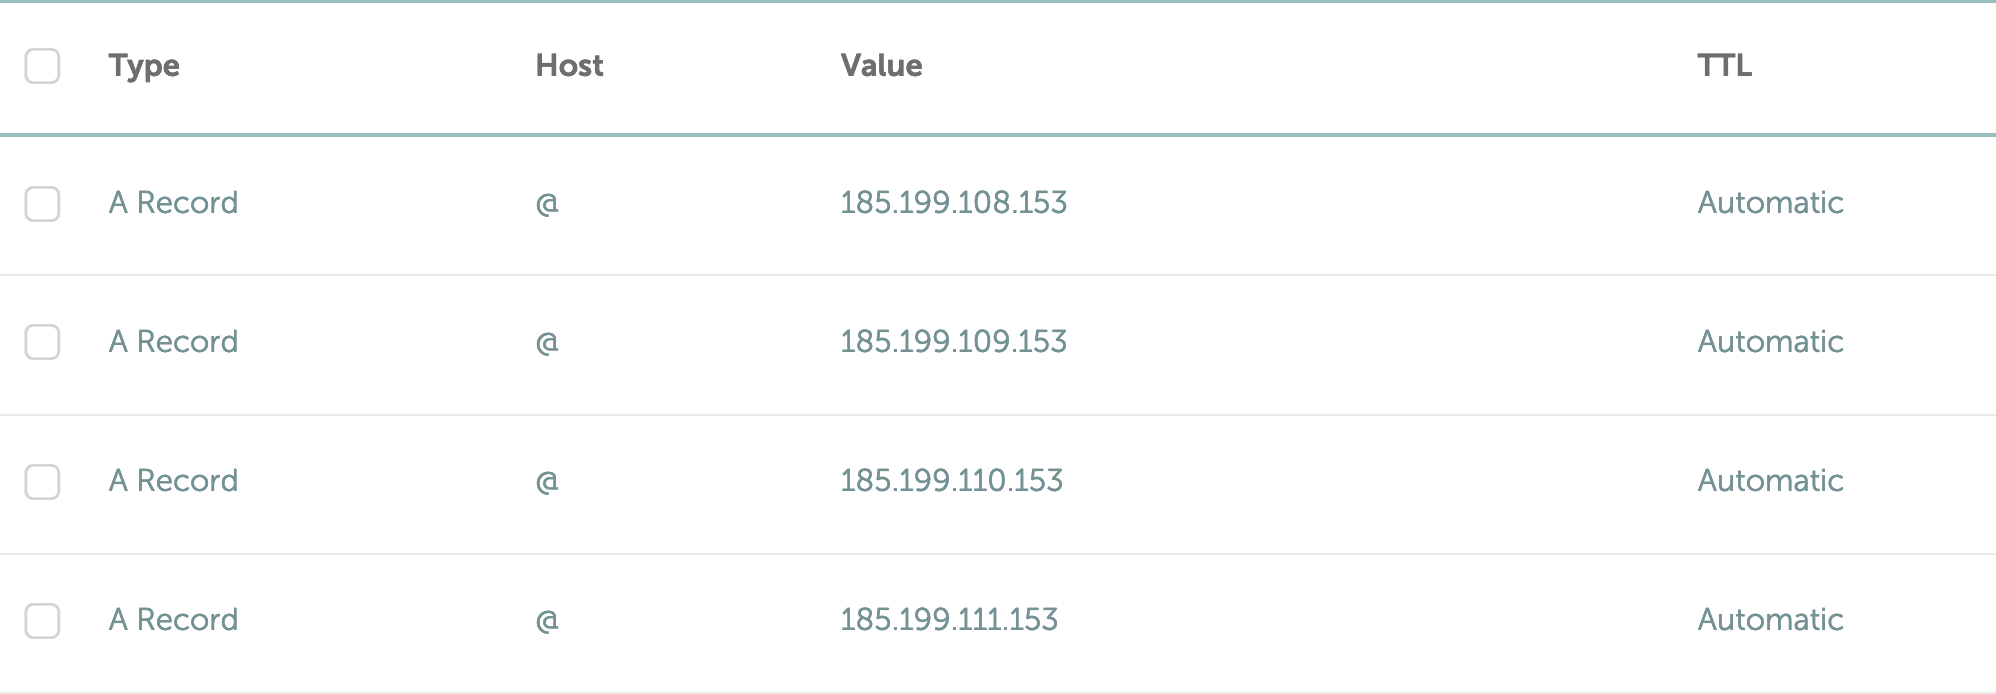
GitHub instructs users to point A records and to 4 GitHub DNS addresses.

GitHub pages configuration
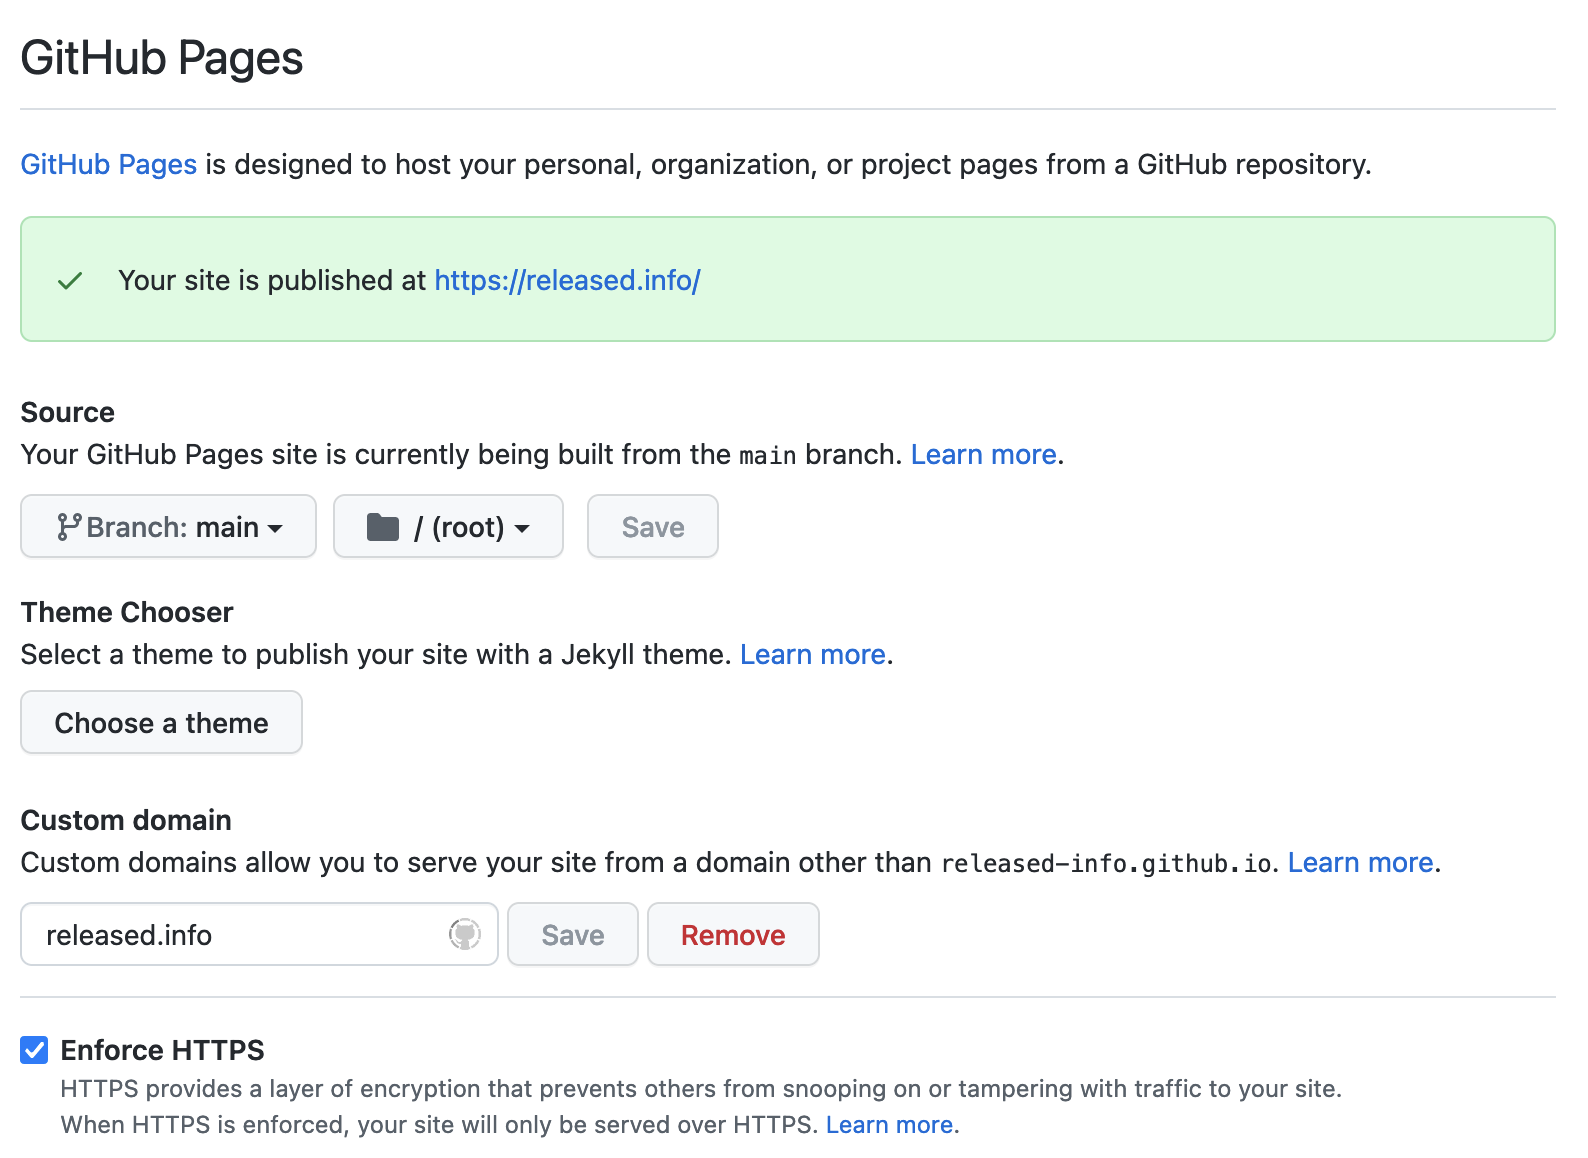
After DNS Namecheap configuration, we can configure the GitHub pages in the settings -> pages just:
- point to which branch serves the content,
- what is the custom domain name,
- click the checkbox to enable
HTTPS.

Subdomains
As I mentioned earlier, I would like to have many subdomains like this: is.java.released.info, is.python.released.info, etc.
For every subdomain, I needed to create another CNAME record.

Additionally, I needed to create a separate GitHub repository for every domain. Namecheap allows users to have 100 CNAME records.
Email sending via Gmail
As I wrote earlier, I use email to notify myself about the changes in the system. I used it because it was very easy to configure.
To send emails programmatically, Gmail created an instruction on how to generate a password for the program.
Generally in your account go to security -> Sign in with Google -> App Passwords.
Later use it as a standard SMTP server.
Receiving emails.
I decided that I would like my contact email to look professional: contact@released.info. I didn’t want to spend much time configuring the SMTP server.
I just used a free https://improvmx.com service to redirect emails from contact@released.info to my personal email account.
So from outside, it looks professional, whereas when I respond back, my personal email will be fully visible. Till now, I didn’t need to respond to anybody ;-)
To use it you need to set an MX Record in your domain provider.
Disadvantages
I am pretty satisfied with how the solution works. However, there are some disadvantages:
- From time to time, some manual actions are required. The web pages are changing constantly. I think some small human intervention will still be needed from time to time.
- Around once per quarter, I have a problem where some subdomain stops, so I have to refresh the webpage. HTML is pushed to the repository, but the webpage is stale. I didn’t use my free quote for minutes… In this case, I simply delete the repository with HTML and recreate it. Then it works again.
Summary
In a described way I achieved a working solution that fulfilled my needs. It is not perfect, but it works, it is free and offers good service.